

SUPPLIES
- cutting mat
- rotary cutter
- straight pins
- sewing scissors
- thread
- 1/2 yard minky dot or other fuzzy fabric
- 1/2 yard flannel or cotton fabric
- 8 pieces of ribbon cut to 6" in length
*Note - this is enough fabric to make two loveys, just double the ribbon!

Step 1
Wash and press cotton/flannel fabrics. Do NOT wash the minky dot and more importantly, don't iron it.
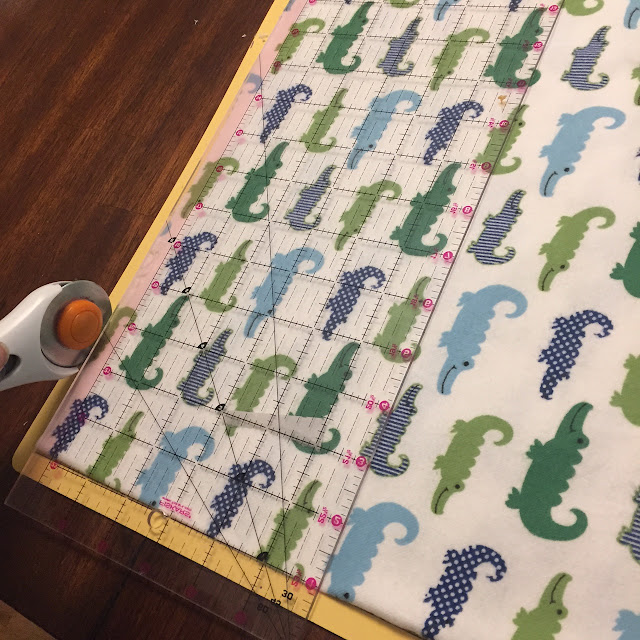
Step 2
Using a cutting mat and rotary cutter, cut both fabrics into 17" x 17" squares. You may be able to cut them slightly larger if your cotton/flannel didn't shrink too much in the wash.

Step 3
Lay the minky dot right-side up on the cutting mat and place the flannel/cotton print right-side down on top.

Step 4
Find the center of each side and pin in the ribbon by folding the ribbon in half and sliding between the two layers of fabric with the fold of the ribbon pointing towards the center and the edge of the ribbon lined up with the edge of the fabric. Repeat on the remaining 3 sides.


Step 5
Pin the final 4 ribbons into the corners of the lovey in a similar manner as step 4.

Step 6
Find a center ribbon. Place an additional pin into the fabric marking the spot directly between this center ribbon and the corner ribbon to the right.

Step 7
Place additional pins if desired, but it's not necessary.
Step 8
Load your machine with white thread and set thread length to 2.

Step 9
Line your fabric up with the right edge of the foot and, beginning with the center ribbon you chose in Step 6, back stitch about 5 stitches, then sew around your lovey, stopping and back-stitching at the additional pin you placed in Step 6.

**Note - Minky can be frustrating to work with. Take your time to keep the top and bottom fabrics lined up, but please don't not stress it if one slips to the left or right and isn't lined up exactly. I promise when you're done you will have a square lovey and no one will know the difference!! Promise. Same if the top fabric bunches on occasion. Just fold the extra fabric and send it through the machine and when you flip the lovey right-side-out you will not notice these minor imperfections.
Step 10
Remove your lovey from the machine and flip it right-side-out through the hole that was left between the pins your marked in Step 6.
Step 11
Find the opening and fold the fabrics in. They should do this naturally. Pin if you would like, but it is not necessary.


Step 12
Set the stitch length to 3. Place the lovey under the sewing foot so that the foot is just at the top of the opening, with the edge of the fabric aligned with the right edge of the sewing foot. Back stitch about 5 stitches, then sew the top stitch around your lovey, back-stitching another 5 stitches once you've gotten to the end.

**Note - you can use a contrasting thread color for this top-stitch if you would like. I went with white this time.
You're done! Hold your lovey up for your husband and kids to oooh and aaah over. Well done!

*Note - this is enough fabric to make two loveys, just double the ribbon!

Step 1
Wash and press cotton/flannel fabrics. Do NOT wash the minky dot and more importantly, don't iron it.
Step 2
Using a cutting mat and rotary cutter, cut both fabrics into 17" x 17" squares. You may be able to cut them slightly larger if your cotton/flannel didn't shrink too much in the wash.


Step 3
Lay the minky dot right-side up on the cutting mat and place the flannel/cotton print right-side down on top.

Step 4
Find the center of each side and pin in the ribbon by folding the ribbon in half and sliding between the two layers of fabric with the fold of the ribbon pointing towards the center and the edge of the ribbon lined up with the edge of the fabric. Repeat on the remaining 3 sides.


Pin the final 4 ribbons into the corners of the lovey in a similar manner as step 4.

Step 6
Find a center ribbon. Place an additional pin into the fabric marking the spot directly between this center ribbon and the corner ribbon to the right.

Step 7
Place additional pins if desired, but it's not necessary.
Step 8
Load your machine with white thread and set thread length to 2.

Step 9
Line your fabric up with the right edge of the foot and, beginning with the center ribbon you chose in Step 6, back stitch about 5 stitches, then sew around your lovey, stopping and back-stitching at the additional pin you placed in Step 6.

**Note - Minky can be frustrating to work with. Take your time to keep the top and bottom fabrics lined up, but please don't not stress it if one slips to the left or right and isn't lined up exactly. I promise when you're done you will have a square lovey and no one will know the difference!! Promise. Same if the top fabric bunches on occasion. Just fold the extra fabric and send it through the machine and when you flip the lovey right-side-out you will not notice these minor imperfections.
Step 10
Remove your lovey from the machine and flip it right-side-out through the hole that was left between the pins your marked in Step 6.
Step 11
Find the opening and fold the fabrics in. They should do this naturally. Pin if you would like, but it is not necessary.


Step 12
Set the stitch length to 3. Place the lovey under the sewing foot so that the foot is just at the top of the opening, with the edge of the fabric aligned with the right edge of the sewing foot. Back stitch about 5 stitches, then sew the top stitch around your lovey, back-stitching another 5 stitches once you've gotten to the end.

**Note - you can use a contrasting thread color for this top-stitch if you would like. I went with white this time.
You're done! Hold your lovey up for your husband and kids to oooh and aaah over. Well done!

No comments :
Post a Comment